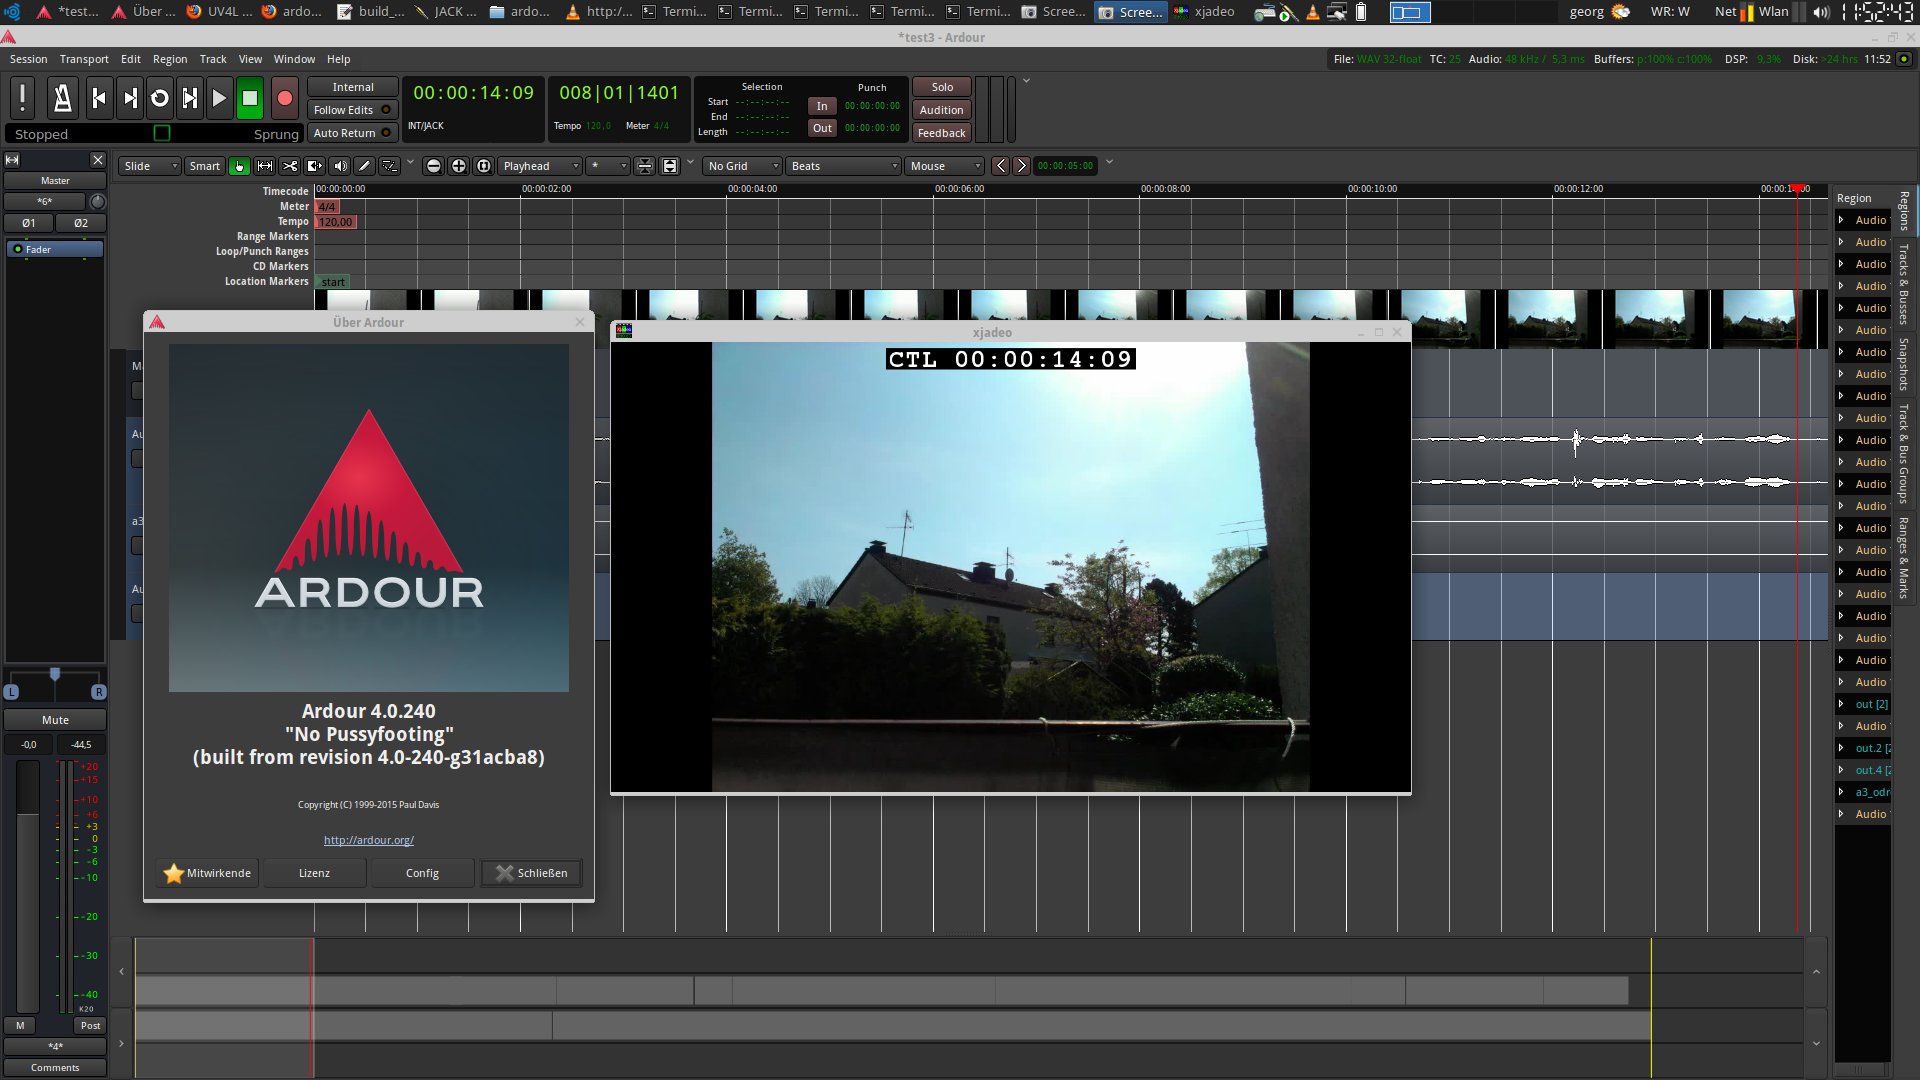
Waveboard – extend your touchboard with more functions

Hi,

the Bare Conductive Touchboard is a wonderful thing to play around with. Here I’ll show you how to use some of the A0-A5 pins and some digital IO-Pins on the board to extend the possibilities of the touch board.

As shown in my first video about the Waveboard the touchboard itself is easy and simple to use and creating a touchboard needs no soldering or other complicated things. But to get most out of the board you should use the unused pins on the board to extend the possibilities the Touch Board covers under the hood.

First impression

The details

Mini timelapse rail for travel with odroid-c1

Hi,

holidays are coming. My big timelapse rail is about 2 meters long. So I decided to build a timelapse rail for our journey with the odroid-c1, a cheap stepper motor and a towel holder with pullout. In this case I use a smartphone as webcam, but also tried it with an old IXUS 500,  which is a little more complicated and not described here.

Blumengieß-Automat mit Arduino und einem alten Zimmerbrunnen

Hallo,

heute habe ich mir für den herannahenden Urlaub einen Automaten zum Blumengießen gebaut. Er besteht aus einem Mikrocontroller (hier: Arduino Uno), einem 8-fach Solid State Relay von SainSmart und einem alten Zimmerbrunnen.

ACHTUNG: Bitte NICHT nachbauen, wenn Sie keine detaillierten Kenntnisse in Bezug auf Schaltkreise, Elektronik und den Umgang mit Starkstrom haben. DIES IST KEIN SPIELZEUG! Spielen Sie NICHT mit Starkstrom. Es ist lebensgefährlich.

Im Video ist zu sehen, wie aus einem Arduino, einer elektromechanischen Zeitschaltuhr, einem Starkstrom-Relais und einem alten Zimmerbrunnen eine kleine Bewässerungsanlage für Zimmer-und Balkonpflanzen gebaut werden kann. Statt des Arduino könnte man auch einen Raspberry Pi mit Internetanbindung (WLAN oder Ethernet) nutzen, um per Internet oder mit dem Smartphone den Brunnen ein- oder auszuschalten. So können Sie vom Urlaubsort aus die Blumen gießen.

Odroid-C1 with Sanyo Denki stepper motor and diy timelapse rail

Hi,

heute gibt es ein Video mit einer Erweiterung meiner selbst gebauten Zeitrafferschiene. Der Odroid-C1 steuert nun einen japanischen Sanyo Denki Stepper Motor über einen Pololu Stepper Motor Treiber A4988 an. Der Motor wird mit einem 12 Volt NiMh-Akku betrieben. Die Steuerlogic, sprich, der Odroid selbst wird separat mit einem 5 Volt Akkupack betrieben.

Hier kann man sehen, wie der Odroid den Sanyo Denki mit meiner Spiegelreflexkamera in einem sehr steilen Winkel auf der Schiene gleiten lässt.

und hier ein Video des Landgutes „Gut Grütersaap“ vom März 2015 mit dem Odroid-c1 und einer alten Canon IXUS 500

Update RT- kernel for Cirrus Logic/Wolfson Audio Card

Hi,

Cirrus Logic have released an update on their sources (https://github.com/CirrusLogic/rpi-linux/wiki/Building-the-code#install-the-kernel-modules-and-dtb-file-on-the-raspberry-pi) for the Raspberry Pi kernel.

For musicians trying to get the older Raspberry Pi boards (only A+ and B+) running in realtime mode like described here I provide an inofficial package for this kernel including all realtime patches. More info about this can be found on http://wiki.linuxaudio.org/wiki/raspberrypi.

The package contains a precompiled realtime kernel and the necessary libs/firmware files including the overlays provided by Cirrus Logic and can be downloaded here.
Instructions for installing the files can be found in the README.txt

This version of the kernel supports mmap which is needed for jack/jackd2 and a lot of other things to work.

A realtime example can be found here: https://blog.georgmill.de/2015/03/28/waveboard-with-arduino/

Have fun.

Waveboard with Arduino

Hallo zusammen,

heute ist der Arduino Tag 2015. Da konnte ich nicht anders und musste mal wieder was Gescheites basteln. Herausgekommen ist das

„Waveboard“, ein berührungsloses Midiboard im Eigenbau aus dem Arduino-Clone „Touchboard“ von Bare Conductive .

Zutaten:

  • 1 Touch Board
  • 12 Kabel
  • 12 CD-Hüllen
  • 1 Micro-USB Kabel
  • 1 Laptop/Rechner mit Midi tauglicherSoftware (hier: Linux, qjackctrl, Yoshimi, Carla, einige Sampler)
  • Spaß am Basteln 😉

Das ist das Ergebnis: